
Our Booth Display Panels
rev: 8/2020
Get printable plan (.pdf).
We built these panels for our booth around 2010 based on panels built by fellow artists Nadine and Glenn Lahti, who gave us a lot of good ideas when we were just getting started.
Dimensions
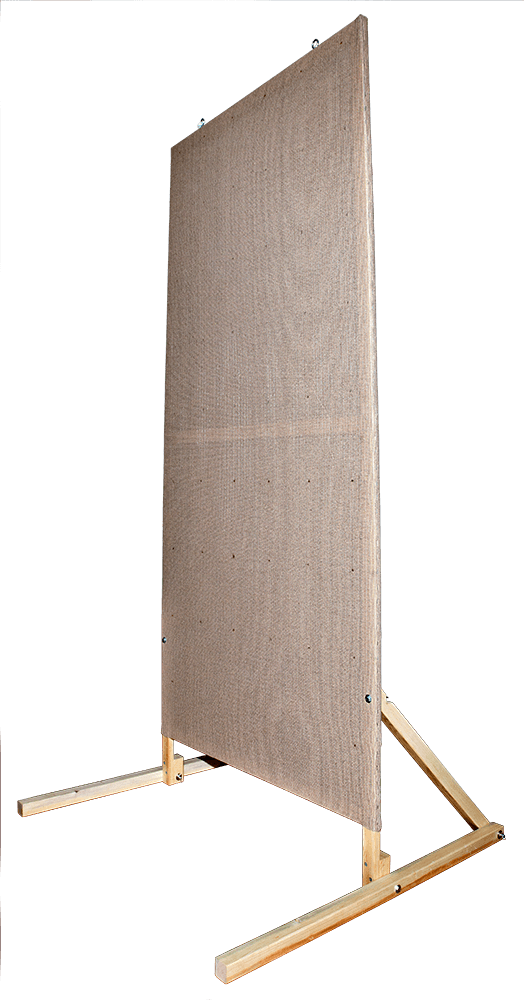
- overall
- 78" by 35" by 1"
- display
- 72" by 35"
- legs
- 36" total length
Wire mesh “hardware cloth” is stapled to a wood frame and then covered with shade cloth. These panels are very light. Available colors include tan, green, brown, and black.
These panels can be used with the legs attached to be free standing, or the legs can be removed and the panels tied to and/or hung from the frame of a tent for art festivals, for example. Pictures can be attached to the panels by hanging from small curtain hooks placed through the hidden hardware cloth.
The total cost of the parts should be about sixty-five ($65) dollars. I didn't record the construction time.
Part List
| Part | Quantity | Description | Pricenotes | |
| panel | legs | |||
| 2"x2" lumber, 6 ft | 0.1 | 1.8 | For legs and 3"-long leg brackets on frame. | $2.11 for 8-ft premium white wood ($4.25) |
| 1"x2" lumber, 10 ft | 2 | 0 | For frame. If you were to use 8-foot lumber, you would need at least three pieceshow instead of two, resulting in much greater waste. If you could find a single ten-foot 1"x4", you could rip (saw along the grain/length) it into 1"x2"s. | $2.76 for 1"x2" 8-ft common $6.25 for 1"x4" 10-ft common ($6.25) |
| 1"x2" lumber, 3 ft | 0.9 | 0 | For frame. | ($1.05) |
| wood glue | as needed | 0 | (?) | |
| flat corner (“L”) brace | 2 | 0 | For top corners of frame (see "Overall" illustration). Number of screw holes may vary. |
$1.57 for 5" zinc ($3.15) |
| T-plate | 4 | 0 | For connecting 1"x2"s in frame (see "Overall" illustration). Number of screw holes may vary. | $3.47 for 5"x5" zinc ($13.10) |
| ⅝" #8 flat-head wood screws | 28 | 0 | Number depends on number of holes in “T” & “L” braces. | $1.18 for zinc 12-pack ($2.80) |
| 1½” #8 flat-head wood screws | 4 | 0 | For connecting 3"x1½”x1½” leg bracket to frame. | $1.18 for zinc 8-pack ($0.60) |
| ½” hardware cloth, ≅35"x72" | 1 (+1 optional) | 0 | We only used hardware cloth on one side. If you think you might want to display art on outside of wall, you will probably want hardware cloth on that side also. | $47.48 for 3'x25' roll (19 gauge) ($11.40) |
| shade cloth, ≅37"x74" | 2 | 0 | For covering frame and hardware cloth. Found in tan, green, black, and dark brown. Both pieces could be combined into one piece. | < $30 for 6'x20' roll (price varies with color) (< $9.00) |
| staples | 225± | 0 | For attaching shade cloth. | (?) |
| 3½” ¼" hex bolt | 0 | 4 | For connecting legs and attaching to frame. | $0.74 for galvanized ($3.00) |
| 2" ¼" hex bolt | 0 | 2 | For attaching legs to frame. | $0.42 for galvanized ($0.85) |
| ¼" flat washers | 0 | 12 | Two for each hex bolt. | $1.18 for 12-pack ($1.20) |
| ¼" wing nuts (20 threads per inch) |
0 | 6 | One for each hex bolt. | $1.18 for 4-pack ($1.80) |
| pin-on curtain hooks | as needed | 0 | For hanging art. | $1.97 for 14-pack (?) |
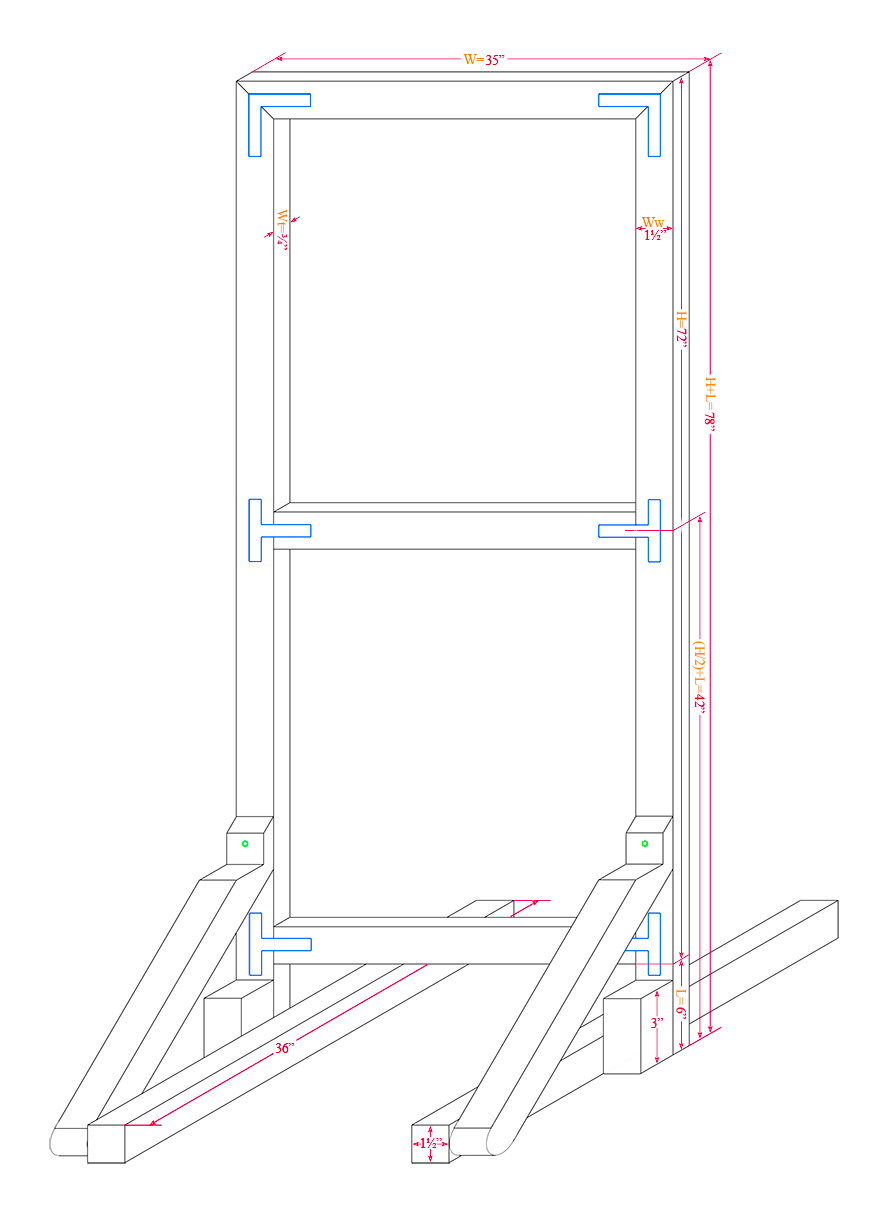
Frame Plans and Dimensions
Building Instructions
Since these detailed instructions were made from my sparse notes years after the project was completed, it is possible I may have forgotten something. Use with caution, and if you do find a mistake, I'd appreciate hearing about it so we can make life easier on the next person tackling this project. Thanks!
- From the first 10-foot 1"x2", cut a 78" side piece (at a 45° miter cut) and the top 35" piece on the frame with a second 45° miter cut. If you use 8-foot boards, use these instructions and skip to Step 4.
- From the second 10-foot 1"x2", cut a 32" cross piece (with normal square (90°) cuts) and the second 78" side piece (at a 45° miter cut).
- From the last 1"x2" board, cut the remaining 32" cross piece on the frame as above.
- If you want legs, from each of two 6-foot 2"x2" pieces, cut a 36" leg square, a 3" leg bracket with a square cut, and a 25⅜” piece with one 45° miter cut. If you don’t need or want legs, just cut a couple 3" leg brackets from as small a 2"x2" board as you can find.
- Assemble, glue, and clamp all of the 1"x2"s. When the glue is dry, add “L” and “T” braces using the ⅝” flat-head screws. I suggest pre-drilling screw holes with a drill bit that is almost as wide as the screw shaft (without the threads).
- Even if you don't need legs, attach each of the 3" leg brackets on the same side of the frame as the braces in the previous step with two 1½” flat-head screws. When pre-drilling the holes, remember the holes in the frame should be at least as wide as the screw threads (including threads) and the holes in the bracket need to be significantly less, as in the previous step. Clamp or tape a bracket in position, Use the smaller bit to drill through the bracket into the frame only as far as the screw would penetrate, then remove the bracket and widen the hole through it with the larger drill bit.
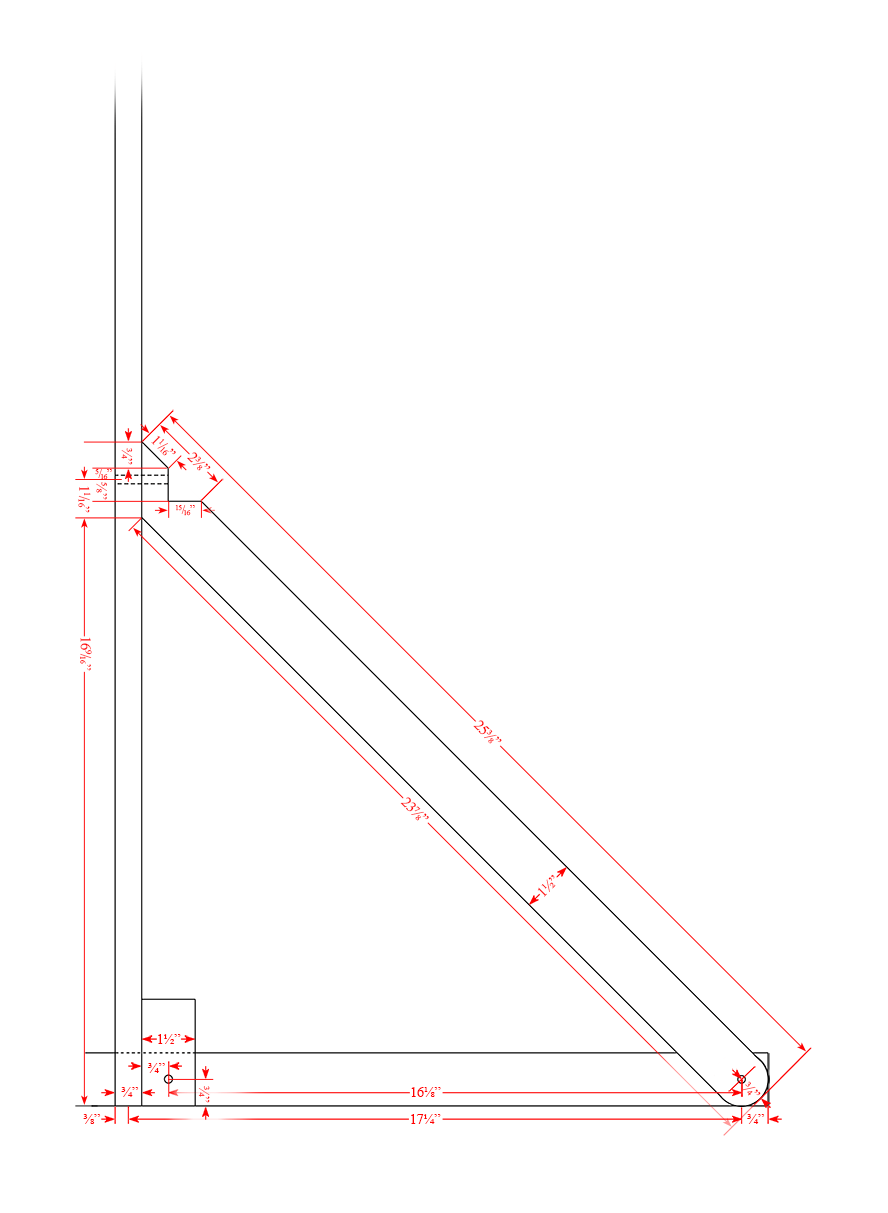
- If you want legs, finish the 25⅜” braces by rounding the bottom end and cutting the notch in the top end. Drill the two bolt holes in that piece, one bolt hole in each of the panel leg brackets, the two bolt holes in the side of the panel frame, and two bolt holes in each of the 36" legs as shown in the “Leg Details” illustration.
- The front of the panel is the side opposite the 3" leg bracket and metal braces. Cut the hardware cloth about 34⅞”x71⅞” (measurements aren’t critical here as long as there is enough hardware cloth to staple to the panel and it doesn’t poke out beyond the edges). Staple the hardware cloth to the front of the panel. If you think you might want to hang your work on both sides, cut an identical piece of hardware cloth and staple it to the back side of the panel. Keep in mind it is easier to add the second piece of hardware cloth now than it will be later. I didn't list specifications or a price for staples because the size or type is not critical; use whatever fits your staple gun, but as long as possible. And don't be stingy on the staples (maybe every inch or so).
- Staple the shade cloth around the panel frame. Since the shade cloth comes 6 feet wide, it would be easiest to wrap it around both faces of the frame and staple along the edges.
Legs
To use the legs, bolt a 25⅜” 2x2 brace to a 36" 2x2 leg at the hole at the end of each piece by placing a washer on the 3½”-long bolt before inserting the bolt through both pieces, and place the other washer and wing nut on to finish. If you place the brace to the right of the leg on the first one, put it to the left on the second (with both pieces oriented the same way in both cases). You may have noticed that on the photograph above that the legs are on the outside of the panel, but in the "Overall" diagram they are on the inside. Either is correct but if you put the legs inside you can place the panels closer together (stability will be only slightly less). Connect the legs to the panel with a two-inch bolt in the upper (notched) end of the brace into the side of the panel and a 3½”-long bolt through the side of the leg bracket on the bottom of the panel so that the wing nut is on the inside of the panel.
Without Legs
Attaching Panels
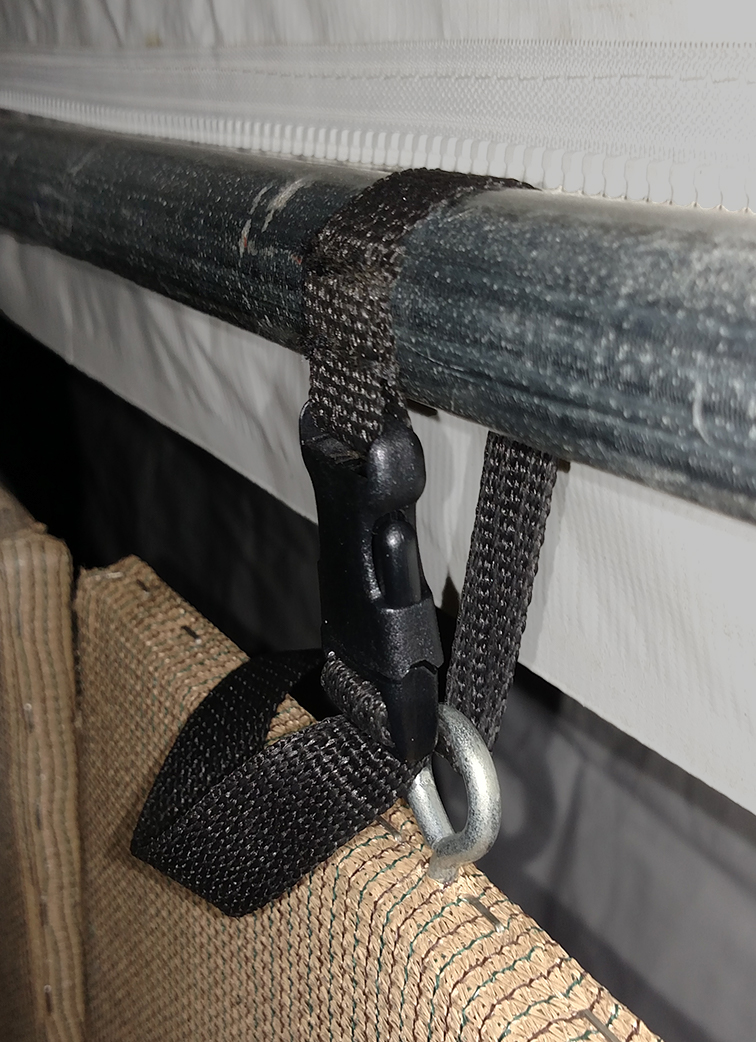
After building the panels, we tried a few different techniques before settling on our current method of securing them to our festival tent.
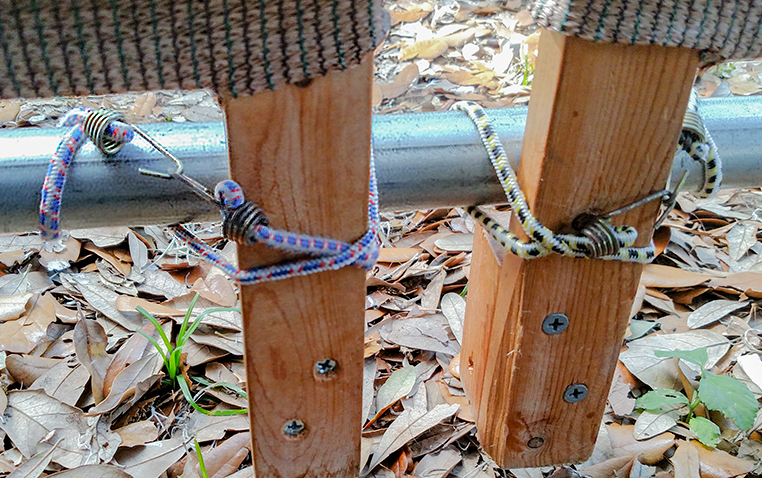
At the top of each panel we added two screw eyes, each about 8" in from the edge of the panel. Then Nancy made the straps by sewing the webbing to the buckles. She cut about 16" for each strap, but depending on your tent or application, your needs may be different.
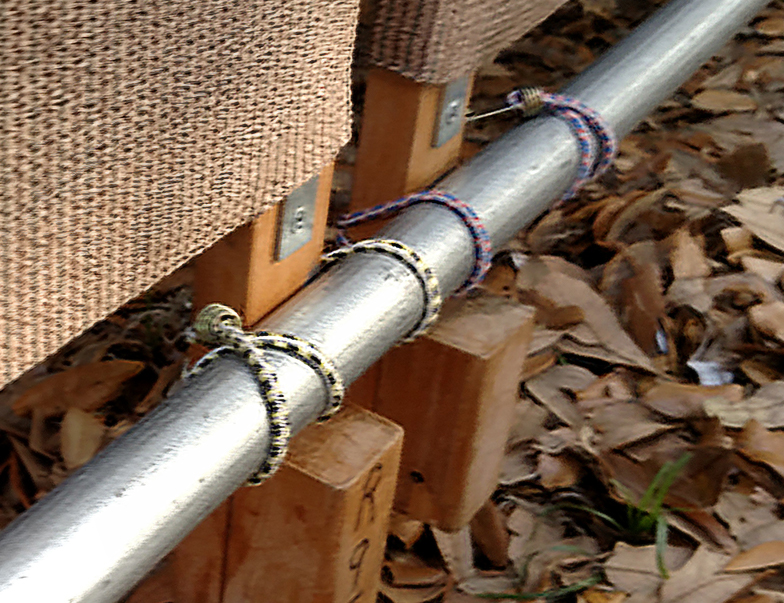
For the base, we just wrapped small bungee cords around each leg.
The prices in red, as the price note says, represent the price for one panel. In our tent we have three panels on each of the three tent sides.
Again, we have a TrimLine tentabout. Your situation and requirements may differ.
| Part | Quantity | Description | Pricenotes |
| #4 zinc-plated steel screw eye | 2 | eye inside diameter ⅝" shank 1" |
$7.70 for 25-pk ($0.65) |
| ¾" webbing strap (polypropylene) | 2.7 ft ± | For hanging panels | $0.09 per foot ($0.25) |
| ¾" side release buckle | 2 | For securing panel straps | $0.98 each ($2.00) |
| Mini bungee cords, 10 in | 2 | For securing legs to tent | $2.87 for 8-pk ($0.75) |
Aligning Neighboring Panels
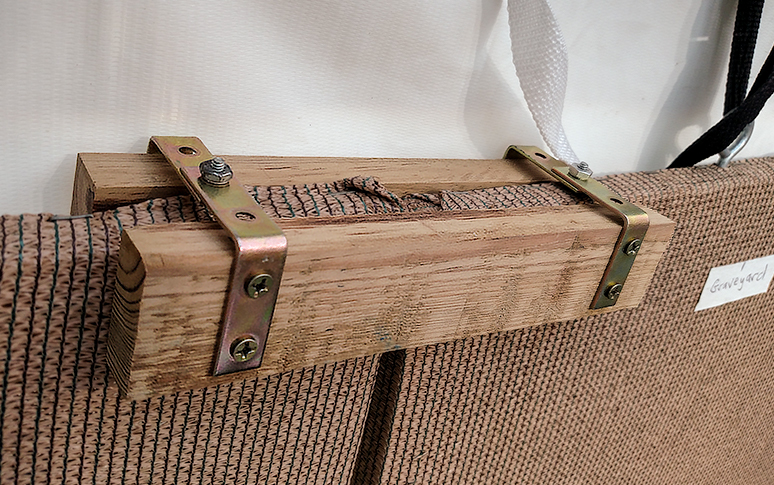
After a while, some of the panels warped, i.e., developed a slight twist so that the adjoining edges didn't quite match. Fortunately, there is more than one way to handle this, depending on your situation. What we did was make little channels span the two upper corners. Our first channels were too shallow to be effective (they kept falling off), but the ones shown here work well.
The 1"x2"s I used were rough and by the time I sanded them down they were 11/16" thick, which worked fine. In fact, these shouldn't hold the panel too snug (but if they are too tight you can bend them apart as needed).
The corner braces we bought included flat-head screws and the holes in the brace were countersunk, but on the "wrong" side of the brace. The braces for which I later found the price did not include screws so I added that item to the list. Without being countersunk, round-head screws would be better.
The type of lock washer is not critical. When I priced them, external-tooth washers were the same price as internal-tooth, which just happened to be what we had in the shop.
The first panel on each wall does not need one of these channels. Every other panel on that wall needs one channel (hence we have six channels). Therefore, price shown in red is the price of one channel.
Plan B: If, as I've seen with some artists, you had a horizontal board spanning the legs at the top of the tent, you might just be able to bolt or otherwise attach the center of the top edge of the panel to the inside face of that board, which would force both upper corners of the panel to also be in line (along the inside face of that board). This plan has not been tested.
| Part | Quantity | Description | Pricenotes |
| 8-in 1"x2" wood | 2 | channel sides | $1.18 for 8-ft furring strip ($0.20) |
| 1½" corner brace | 4 | to connect channel sides | $2.88 for 4-pk ($2.90) |
| #6 ⅝" round-head zinc-plated screws | 8 | attaching channel sides to braces | $1.18 for 8-pk ($1.20) |
| #6-32 ⅜" round-head zinc-plated machine screws | 2 | For connecting corner braces | $1.86 for 75-pk ($0.05) |
| #6 zinc flat washer | 2 | For head of machine screw | $4.36 for 100-pk ($0.10) |
| #6 zinc-plated internal-tooth lock washer | 2 | on machine screw just before nut | $1.18 for 20-pk ($0.15) |
| #6-32 zinc-plated machine screw nut | 2 | For machine screw | $1.18 for 12-pk ($0.20) |
Hang Art
To hang your art, stick the pointy end of the curtain hook (pointing down) through the shade cloth just above a wire in the hidden hardware cloth. For most of our framed images, which use glass, are around 19" by 22" overall, and weigh about five pounds, one hook is fine. Our largest framed piece, which measures about 39" by 31" overall and weighs eighteen pounds, gets two hooks, as do our wider canvases (even though they weigh less). We would also use two hooks if we wanted a piece of art to straddle two panels, placing a hook near the edge of each panel. And you can always use a second hook if wind or other ambient conditions make it more difficult to keep the picture straight during your presentation.
You can contact us if you have any questions, or hit the Comment Button below if you have any suggestions for improvement.