
Get printable version(.pdf)
Get Excel file (as discussed below)
Keeping Your Squaring Arm Square
I have a Logan Model 660 Framers Edge mat cutter but I’m pretty sure that these instructions can be modified to accommodate other makes and models, as I describe toward the end of this article. There are two things I don’t like about the instructions on how to “Re-Square the Squaring Arm” in my Instruction and Operation Manual. First, it requires a carpenter’s square. Second, it involves too much trial and error.
“So What’s Wrong With A Carpenter’s Square?”
The main thing is that it is unnecessary. If that’s enough of an answer for you, skip ahead to the next section. Another problem, if you don’t already happen to have a square, is the cost, which could be between $15 and $25. You’ll want a larger square (to a certain point) because they would be more accurate. Something around the size of your largest picture frame would be great. It can’t be flimsy, and conventional wisdom says that the more expensive ones are more accurate. I’ve never been sold on conventional wisdom, however. In a short article on the Instructables web site (www.instructables.com/id/Checking-a-Square-Before-You-Buy) Phil B. explains how easy it is to test your square right in the store. I thought his last paragraph was the most revealing - most squares may not be accurate enough for your precision work. What is “precision work”? You might think I’m picky, but I get a little annoyed when I see one end of my fourth cut on a mat is more than 1/16" away from the mat guide over a length of say 2½ feet. As noticeable as that is, it represents only 1/30 of a degree of error in your squaring arm. I consider that precision work.
My Method
This method does not need a square; it only requires that your squaring arm and your cutting bar both be straight. There are a few ways to check on this, but I think most people satisfy themselves on this point by just sighting along the edge. It also requires a simple calculator (or adding machine, or smart phone, or slide rule) to do one division problem (or not! See “I Don’t Have A Calculator!” below). Here is how it’s done.
- Find Scrap Mat Board - You need a fairly large piece of mat board. You are only going to cut maybe 1/4" off of each of the first three edges, so if you don’t have a large scrap piece handy you could just cut your first and largest mat of the day one inch larger in length and in width, make the test cuts and the adjustment, and then cut to size. Or you could even use a full-size mat board or even foam board, which is cheaper.
- Make First Cut - Put the straightest edge of your mat board against the squaring arm so that only a smidgen goes under the cutting bar. I put a long piece of scrap mat board under the other edge of the cutting bar to keep the blade vertical, but that might not be strictly necessary. Make your cut.
- Make Two More Cuts - Put the newly cut edge against the squaring arm in a similar fashion and make your second cut. Repeat one more time for your third and final cut. You are doing multiple cuts because the error in the squaring arm is cumulative the first four times, meaning it gets bigger every time you cut and will be easier to measure. But you won’t actually be making that fourth cut, just measuring the error that the cut would have made. After the fourth cut, the error stops getting larger because you then start re-cutting sides, which obliterates the error of the first cut on that side. That means if you lose count just cut it one more time - it won’t make any difference.
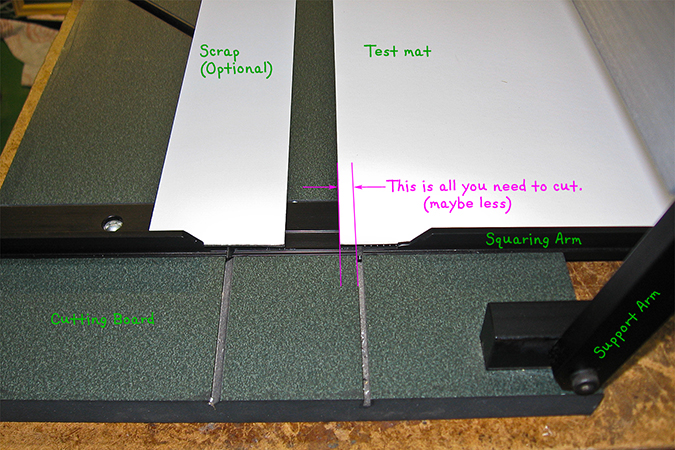
- Position Last-cut Edge - With the handle bar down, rest your last cut against the squaring arm and slide the mat until one of the corners of the next (uncut) side just touches the cutting bar. Call the corner that touches the cutting bar the “good” corner.
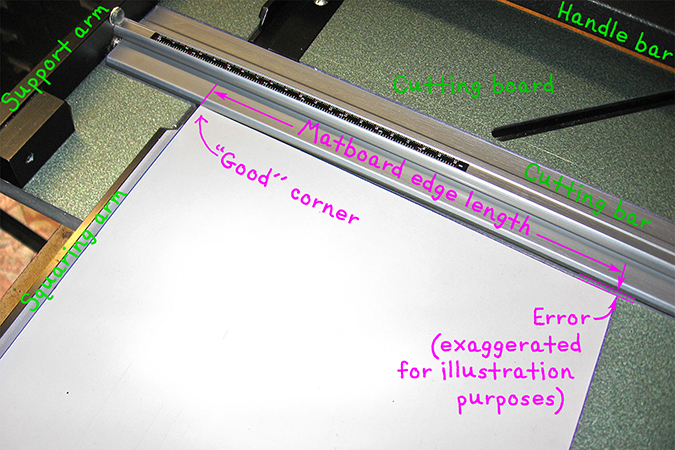
- Measure Gap - First measure the error or the distance the non-touching corner is away from the cutting bar. I use the metric side of my yard stick for this, not because I’m so enamored with the French, but because millimeters are smaller and because sixteenths of an inch would need an extra conversion step to fit into the calculator. Write this number down.
- Measure Length - Now measure the length of the edge of the mat board (that you didn’t cut) against the cutting bar. Write that down.
- Remove the squaring arm.
- Calculate Adjustment Screw Rotation - On your calculator (or equivalent), first multiply the Adjustment Constant, 12,345Note, by your error (your first measurement - hopefully the small measurement). Then divide this answer by your second (larger) measurement, the length of the last uncut side. This answer is the number of degrees you will turn Screw A, which will be your adjustment screw.
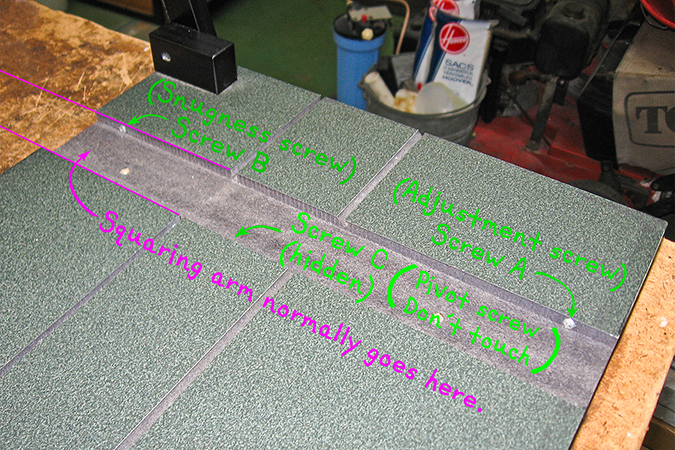
Screw A is the adjustment screw because it is farther from Screw C, the pivot screw, than Screw B is, which means the adjustments will be finer, meaning your angle measurements don’t have to be as precise. If the “good” corner is along the squaring arm, turn the screw clockwise. - Calculate Snugging Screw Adjustment - Multiply your last answer by Snugging Constant 0.8. This is the approximate angle you will turn Screw B in the opposite direction you turned Screw A. I say ‘approximate’ because Screw B is just your snugging screw. You turn it as needed to keep the squaring arm from wiggling when you cut mats.
- Reattach Squaring Arm - Re-install squaring arm and get back to work.
“I Don’t Have A Calculator!”
You could do these calculations in your head if you were so inclined. Most people consider the division the most problematic for this. On the other hand the simple calculators that you need for this exercise are fairly cheap - certainly less than the cost of a carpenter’s square. Or you could use the table below. You would have to measure the error at the specific distance from the “good” corner shown in the heading of either the third column (if you are measuring in sixteenths of an inch) or the fourth column (if you are measuring in millimeters). For example, if you want to measure in millimeters, find the number in the fourth column that most closely matches the error you measured at a distance of 250 millimeters from the “good” corner. Then follow that row to the left to find the amount to turn both the adjustment screw (in the first column) and the snugging screw (in the second column).
| Number of degrees to turn adjustment screw | Number of degrees to turn snugging screw | Error (in 1/16") measured 12 inches along cutting bar from “good” corner. | Error (in mm) measured 250 mm along cutting bar from “good” corner. |
|---|---|---|---|
| 10 | 8 | 0.2 | 0.2 |
| 20 | 16 | 0.3 | 0.4 |
| 30 | 24 | 0.5 | 0.6 |
| 40 | 32 | 0.6 | 0.8 |
| 50 | 40 | 0.8 | 1.0 |
| 60 | 48 | 0.9 | 1.2 |
| 70 | 56 | 1.1 | 1.4 |
| 80 | 64 | 1.2 | 1.6 |
| 90 | 72 | 1.4 | 1.8 |
| 100 | 80 | 1.6 | 2.0 |
| 110 | 88 | 1.7 | 2.2 |
| 120 | 96 | 1.9 | 2.4 |
| 130 | 104 | 2.0 | 2.6 |
| 140 | 112 | 2.2 | 2.8 |
| 150 | 120 | 2.3 | 3.0 |
| 160 | 128 | 2.5 | 3.2 |
| 170 | 136 | 2.6 | 3.4 |
| 180 | 144 | 2.8 | 3.6 |
Your final option would be to download the Microsoft Excel file “Re-square your mat cutter.xls” from this web site, change those specified distances to something more convenient, as needed, and print your own table.
“But I Really Like My (Gold Plated) Carpenter’s Square!”
All right, if you must use it, you can at least reduce the amount of trial and error by taking the following steps. This will be faster than the process described above, but not as precise. Place your square as you would the third and fourth sides of your mat board in Step 3 above, and take the error and length measurements described. Then continue to follow the above instructions to the end. The only difference is that you would make four times the adjustment you calculated in Steps 6 and 7 because the error you measured here would be the error of only one cut instead of four.
“What If I Have a Different Model of Mat Cutter?”
If your squaring arm adjustment mechanism is the same (meaning your mat cutter has three screws controlling the squaring arm, with the two end screws on one side of the arm and the middle pivot screw on the other), then you will be able to use this same technique to re-square your mat cutter. First, you will need to take a few measurements to determine new constants to replace 12345 as the Adjustment Constant in Step 6 and 0.8 as the Snugging Constant in Step 7. You will need to know the distances between each of the outside screws and the middle screw. The middle screw (C) will be the pivot screw, and the adjustment screw will be the end screw furthest from that pivot screw. If both end screws are the same distance from the middle screw, you can choose either end screw to be your adjustment screw, and the other end to be your snugging screw. If Screw B turns out to be your adjustment screw, then your adjustments will have the opposite effect as described in Step 6, meaning that if the “good” corner is along the squaring arm, you need to turn the adjustment screw counterclockwise and the snugness screw clockwise. If the pivot screw is on the outside of the squaring arm and/or the mat cutter is some sort of mirrored image of the one shown here, then you will have to figure out which way to turn the screws on your own. Good luck. You will also need to know how many threads there are per millimeter (or inch, depending on the units of your distance measurements) on the three screws. All three measurements must have the same unit of measure (millimeters or inches). Remember, there are 25.4 millimeters per inch, if you need to convert one of your measurements (but if you are going to be doing these calculations in your head, you can round off to 25 millimeters per inch). Then use these formulas:
Adjustment Constant = (Distance between Pivot Screw C and Adjustment Screw) x (number of threads per unit of length of your adjustment screw) x 90.
Snugging Constant = (Distance between Pivot Screw C and Snugging Screw) / (Distance between Pivot Screw C and Adjustment Screw)
Again, all three measurements need to be in millimeters, or they all need to be in inches. If you were to download the Microsoft Excel file “Re-square your mat cutter.xls” from this web site, as described in the last section, then you could just plug your measurements into the appropriately labeled box and your computer would take it from there.
Addendum: “Don’t We Need Sines or Tangents For This?”
I’m adding these notes for those of you who took trigonometry in high school, especially for those of you who were hoping that this would be the first opportunity you ever had to use it. (I suspect the truth about that is that other chances have come and gone; you just haven’t paid enough attention). The short answer to the opening question for this section is “No, but then yes, but not actually”.
In the method described in the manual and modified above that uses the carpenter square, you don’t need trigonometry. All you need for that is a little geometry to set up a small equation based on the ratios of the comparable sides of similar triangles. You will be comparing the error triangle of the mat board (represented by the error you measured and the length of the mat edge) with the adjustment triangle (represented by the distance you drive the screws and the distance between the adjustment screw and the pivot screw).
Since my technique quadruples the error angle by making so many cuts, which makes the error easier to measure, you would need trigonometry to convert the ratio of two linear measurements (specifically the error and the length of the mat edge again) to an angle by taking the arctangent, so that you can divide that angle by four to get the error of one cut. Finally you would need to use another trigonometric function (the tangent) to convert the angle back into another ratio of measurements (this time the distance you need to move the adjustment screw in or out and the distance between the adjustment screw and the pivot screw) so you can find how far to turn the screws.
One thing they may not have told you in your trigonometry class (who can remember that far back) is that if the angle is less than ten degrees (and the angles described here are about one percent of that), then some of the trigonometric functions, like the sine and the tangent, start to behave like straight lines. In English, that means that if you are using the right units in your measurements, the tangent of an angle is the same number as the angle itself, so you can just go and scratch out the word “tangent” wherever you see it in the equation and your trigonometric formula turns into an equation with nothing more menacing than multiplication or division. That’s what happened here. If you really want to see the full trigonometric formulas, just download “Re-square your mat cutter.xls”. Like all spreadsheet files, if you click on any number in that file you can see the underlying equation in a box toward the top of the screen.
Enjoy.
You can contact us if you have any questions, or hit the Comment Button below if you have any suggestions for improvement.