
Using The Vanishing Point To Keep The Size Right When Moving Wildlife Around
Because things appear to get smaller as they get further away, each set of parallel lines will converge at some “vanishing” point. As you may remember from taking art in elementary school, vanishing points were used to make your drawings of boxes look more realistic than the boxes of your classmates, and could also work with rectangular-prism-like buildings with straight and parallel lines. Nancy & I don’t do cityscapes, so today all of our parallel lines will be imaginary construction lines, but the technique is every bit as powerful, if not more so. First I will explain the basic technique, which should work with all editing software. Then I’ll show how the vanishing point filter in Photoshop could make your life a little easier.
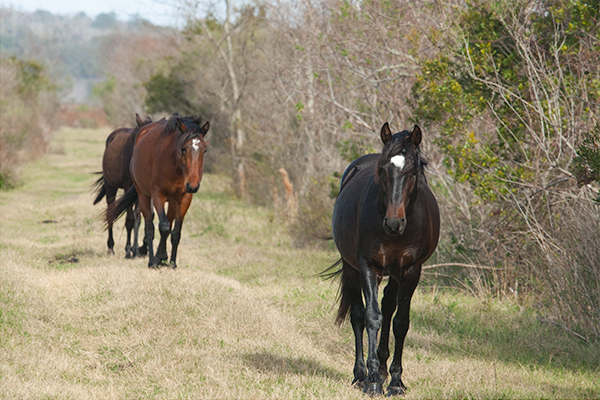
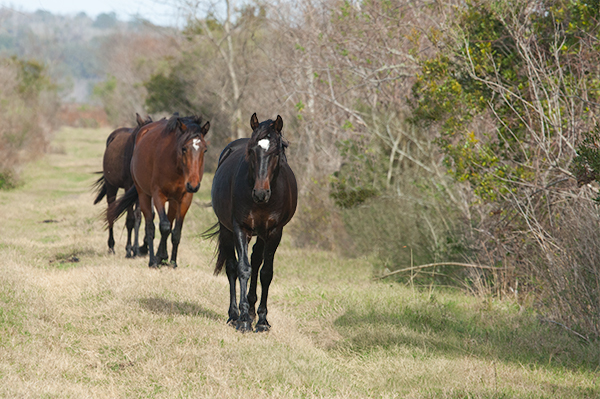
For our example, we will be using a picture Nancy took in Paynes Prairie Preserve State Park near Gainesville in early 2009 of some of their wild horses walking down the trail (Photographic details: Canon EOS 30D camera w/ EF 100-400mm f/4.5-5.6L IS USM lens set at 285mm. Camera was on f/9 for 1/640 sec at ISO 800.). Since one cannot have their subject walking out of the picture, we have two choices; we could add some grass below the feet of the lead stallion using either the clone stamp or content-aware fill (which doesn’t always work well for me), or we could try moving that horse back toward the rest of the harras. That’s what we’ll do. To keep him from looking like a giant next to the others, we will use vanishing points to help resize him.
The Old Way
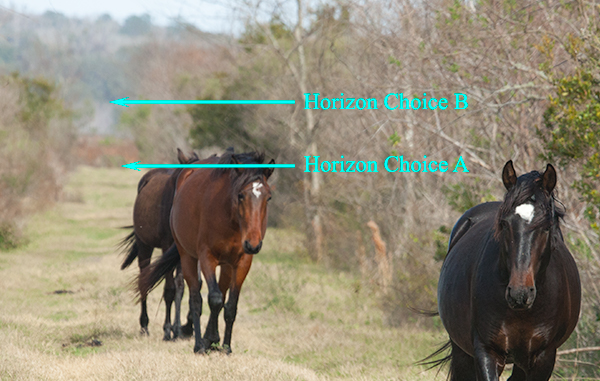
- Find the horizon. When you are at sea, this part is trivial. Ashore, not always so. The base of the trees at the end of the path (Horizon Choice A, below) seems like a good choice, but may be a tad low, considering that Nancy’s height of eye should probably be a little higher than the back of the horses. The base of the trees on the hill behind that (Horizon Choice B) would be another candidate. We can use vanishing points to help us find the right spot.
- Decide the destination of the subject. To keep the right height of the horse, we will use 'vanishing' horizontal lines, this time in a vertical plane; one line is formed by the foot of the horse as we move him and one is formed by the path of his ear. These are parallel because they will be the same distance apart (in the real world) in both his present and future location.
- After making another group called “Find height”, I drew a vertical line (Line “Old”) through the tip of the subject horse’s right ear (the ear to your left). This line also happened to go through the horse’s left front hoof. I made a circle at both of those locations.
- Next I drew another vertical line (Line “New”) to the left (but still in front of the other horses), where I wanted those reference points (the ear and the hoof) to wind up in my final picture. Instead of putting him in the same rut, I also wanted to move him a toward the center of the trail, like his friends. I made another circle where the bottom of his hoof would wind up (I could have made the circle where I wanted his ear instead, but not both).
- Extend a line through the two hoof points/circles past the horizon. Where it meets the horizon is the vanishing point (which is a point common to both “parallel” lines). I drew a short green vertical line through this vanishing point, circled it, and added a label in the same layer I put the horizon.
- Back in the “Find height” group, I drew the line between the just-located vanishing point and the ear circle. Where this line intersects Line “New” will be the new ear tip location.
- Now you need to measure the height of the old horse and the new horse by measuring the distance between the circled bottom-of-the-hoof point and the circled tip-of-the-ear point on both Line “Old” and then Line “New”. The easiest way to do this is to use the Ruler Tool (which may be hidden under the Eyedropper Tool). Drag a line between the two points. L1 will be the number of pixel widths between the two. Jot it down and label it. In this case the distance from the old hoof to the ear was 1,604 pixels. At the new location, the distance was 1,289 pixels. You will need the “Find height” construction line group for positioning the new horse later.
- Select the layer with the image after making all others invisible. Using one of the Marquee Tools, select an area around the subject horse and its shadow. Copy.
- Click on File on the menu bar, then “New...”. Click the Clipboard option, then click Create. Paste.
- Click on Image on the menu bar, then “Image Size...”. Put a check in the Resample box and pick an appropriate method. This time we have a reduction, but that may not always be the case. Change the units of the Height and Width to Pixels. Multiply the number of pixels in the largest dimension by the new horse height that you jotted down in Step 6 and divide by the old horse height. Round the answer to the nearest integer (or whole number). Replace the number in the largest dimension with your answer. In this case, the image size of the new file was 1,384 pixels wide by 1,676 pixels high. I replaced the 1,676 (this time the height was the new file’s largest dimension) by (1,676 x 1,289 (which is the new horse height)) ÷ 1,604 (the old horse height) = 1,347. The width automatically changed from 1,384 pixels to 1,112 pixels (which is the same number you would have gotten if you put 1,384 in the above equation instead of 1,676). The horse gets smaller. Click OK. Change the name of the layer with the horse image in this new file to “New Horse” or equivalent.
- Click Window on the menu bar, then Arrange, then select one of the Tile options. Drag the “New Horse” layer to the original file. Make the “Find height” group visible again and move the new horse into position (reducing the Opacity of the "Find height" group might make positioning easier). Again, if so inclined, you can delete the temporary file you just created and all of the remaining groups containing construction lines.
- That concludes this lesson, except for the shortcut below (“Using Photoshop's Vanishing Point Filter”). Your picture is not finished yet, but the rest is beyond the scope of this exercise. You still need to mask your new horse and shadow. If you are not happy with his new location (maybe his butt obscures the horses behind him), you may move him left or right at no additional cost. If you want to move him forward or back a little more, then you need to resize and should probably start over from Step 3 rather than resize the horse a second time. You also need to get rid of the old horse. You can try content-aware fill, or the clone stamp, or even steal the missing background from another photograph (I'm sure you took more than one picture as the horse walked by). Then you may want to crop the new image or do other editing, as necessary. Congratulations.
It is quite possible that the vanishing point and/or your horizon may be just out of the picture. In that case, increase the canvas size so that you will be able to draw both on the canvas. Make a group, call it something like “find horizon”, and select it before making construction lines so it will be easier to delete them en masse when no longer needed.
The trail seems to be an obvious choice for horizontal parallel lines, but in this case, it appears to have a slight curve to the right halfway up to the horizon. Using the bottom half of the trail, the right edge of the trail (Line C) and two worn ruts (Lines D & E) converge just to the left of the picture’s left edge. We’ll put the horizon at that height. I drew the horizon in green on a separate layer outside of the previous group. From the upper half of the trail, the left edge of the trail (Line F) and the same rut as Line E (now Line G) would represent another set of horizontal parallel lines converging to another vanishing point on the same horizon. That they turn out to be at the same level as the first vanishing point gives us some confidence. Keep in mind, parallel line interpretation in the field is not an exact science. Also, the more things you have to estimate, the less precise your final answer will be. That is why I made my construction lines fatter. We will need the horizon line very soon; all the blue lines (ideally in one group) can be deleted now.
Using Photoshop’s Vanishing Point Filter
This filter isn’t as much of a shortcut as I had imaginedwhy not, but it does save you from doing the math and changing the horse size manually. It will involve making three attached planes with the Vanishing Point Filter and pulling the horse around.
First, follow Steps 1 through 5 above.
- Make a new “Move horse” group.
- Next we are going to make a rectangle to represent a plane at the same distance as the old horse reference points. Put horizontal guide lines through the ear point and the hoof point (previously circled on Line “Old”). Put vertical guide lines just a little to the left of the end of the shadow and a little to the right of the subject horse. Click View on the menu bar and then make sure Snap is checked. Use those guides to draw a yellow rectangle with no fill around the subject. Remove the guides.
- Now we will make a rectangle representing the destination plane. Draw yellow (or orange) construction lines from each of the four corners of Step 7's yellow rectangle to the vanishing point from Step 4. Put horizontal guides through the ear point and the hoof point on Line “New”. Hide the “Find height” group and the “Horizon” layer to keep things from getting confusing. Make your new yellow rectangle; your corners will be where the four yellow/orange construction lines you just made intersect the two horizontal guide lines. It looks like you made a little box. Remove the guides. Next, we will be interested in the front of the box (the first yellow rectangle you made) , the back or the box (the second yellow rectangle you just made), and the right side of the box, which will be our reference plane.
- Select the layer with the image. Click Filter on the menu bar, then “Vanishing Point...”. Using the “Create Plane Tool”, make the reference plane first by sequentially clicking the right two corners of both yellow rectangles. You might have to play with those corners to turn the resulting grid blue. Using the “Edit Plane Tool” extend the plane up and down just a bit to give the horse some breathing space by dragging the little square along the top edge of the grid up a tad, and then dragging the square along the bottom edge down about the same amount.
- Create the front “Source” plane by selecting the “Create Plane Tool” again and then dragging the little square in the middle of the right edge of that reference plane left to the left edge of the front yellow rectangle.
- Reselect the first (reference) plane, reselect the “Create Plane Tool”, and create the back “Destination” plane by dragging the little square on the back/left edge of the reference plane left to the other edge of the back yellow rectangle. Click OK to close the vanishing point window.
- Hide all construction lines. You could even delete the “Move horse” group now. Select the layer with the image. Make a new empty layer above it, labeling it something like “New horse”, and select that layer.
- Go back into the vanishing point filter. Select the Marquee Tool to make a selection rectangle covering almost the entire back (Destination) plane. Change “Move Mode” to Source, put the cursor in the selection rectangle, hold the “Ctrl” key down while dragging the old horse and shadow into view. Again click OK to close the window.
- The new horse will be in the “New horse” layer. Make the “Find height” group visible again and move the new horse into position. Again, if so inclined, you can delete the groups containing your construction lines.
Return to Step 11 of the first set of instructions. Again, congratulations!
You can contact us if you have any questions, or hit the Comment Button below if you have any suggestions for improvement.