Making A Cardboard Box To Ship Art
rev: 8/2020
Get printable plan (.pdf).Other Options
Most of our work is sold at art festivals, but occasionally we have a need to ship Nancy's images that we've either matted and framed or printed on canvas and gallery-wrapped and can come in a number of different sizes. We've looked at having boxes made, but the minimum order to get a reasonable price is usually in the hundreds of boxes of any particular size.
Another option would be to reuse the boxes one has already received, but to ensure an adequate selection requires a fair amount of storage space and a supply adequate to meet the demand. Even if this strategy cannot satisfy all of your needs, it might still represent a supply of opportunity that should not be taken lightly, and would save you time and money. But check the "calculate a price" feature at the U.S. Postal Service, UPS, and/or FedEx websites (or the sites of your other carriers of choice) before ruling out an existing box that seems too large for a project; recently I discovered that although an existing box that was much larger than I needed (28"x17"x4" vs. 20"x16"x3") would have cost ten dollars more at UPS, both boxes would have been the same price at the Post Office (you will usually find that artwork is low density and the price is frequently determined by its 'dimensional weight', meaning instead of charging you based on actual weight, they charge based on a minimum 'weight' that is calculated from the physical dimensions (some combination of length, width, height, and/or girth) of the package).
Sometimes your other options won't help you and you will need to build your own box.
Building Your Box
- Measure the actual length, width, and height of your piece of art. Like the carriers discussed above, we have defined length as the longest dimension (followed by the width).
- To each dimension, add at least 11/2" (so that you have at least 3/4" padding on each side).
- The fourth and final measurement, as I hinted above, is the cardboard thickness, which will probably be 1/8" to 1/4" (you will not find, nor would you want the size used in the example, which was deliberately exaggerated for illustration purposes).
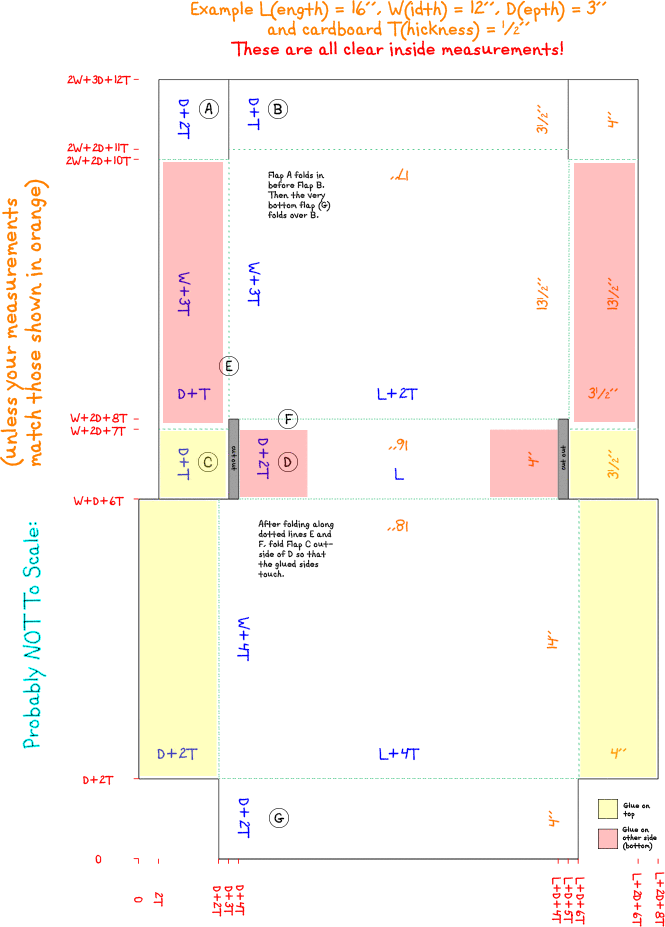
- Draw your lines on cardboard. You will need a piece of cardboard that is (L + 2D + 8T) by (2W + 3D + 12T). Make sure that lower left corner is square (90°). You can lay out the cut and fold lines with the carpenter's square using a number of techniques. Along the bottom and right edges of the plans in red, I've given mathematical expressions giving the distance from the lower left corner of the cardboard of all necessary construction lines, or you could use a subset (smaller number) of lines on an incremental basis.
- Cut the solid cut-lines with a box cutter.
- You can use a spline installation tool (a.k.a screen rolling tool) to crease the fold lines (dashed lines on the plan). The spline tool requires much less pressure when creasing with the 'grain' than when going against it.
- Use contact cement to glue the pieces together as shown in the plan.
For ease of packing, our box opens on a side with the length as one edge. For strength, that side's other edge is the depth, and all of the doubled sides have the depth as one edge. If you would rather your box open along one of the other sides, just redefine the dimensions as necessary.
These are the numbers that you will plug into the mathematical expressions on the plans. These plans will give you a box that has that much clear space on the inside. (Your carrier will be interested in the outside measurements, which can be conservatively estimated by adding four times the cardboard thickness to each of the three dimensions.)

And that's it, you are finished. Congratulations. You can contact us if you have any questions, or hit the Comment Button below if you have any suggestions for improvement.