Since I promised in the Postscript of my last blog articleLink1, here are more ideas for taking pictures of the solar eclipse with your smart phone. This article gives no suggestions specifically catered to regular cameras. However, thoughts on image composition, etc. would apply to both crowds.
For the sake of transparency, I should mention that I’m not an avid phone camera user. I don’t much like my phone camera, mostly because of the lack of control. That results in taking several pictures of the same thing in the hope that one of them will turn out. Maybe I’ve been spoiled. Nancy is the (nature and wildlife) photographer (with the good camera). But all I need pictures for is our blog. On the plus side, I don’t write about things for which I have no experience (without warning). Nor do I write about topics that are already well covered.
Which Lens?
In my first article on the subjectLink2, I discussed the advantages and disadvantages of the regular rear-facing lenses compared to the selfie lens. I won’t repeat myself here. I, therefore, consider it a personal decision, but I now think the selfie camera would be better for most users. Although the reflections make the screen very difficult to see, it is still better than the alternative. Later I’ll give alternatives to the missing flash. And if you really need the greater resolution and control, you should find a real camera.
Notes on Composition
When I bought some eclipse glasses (which still haven’t arrived), I noticed that some packages include cell phone lens attachments. Mine didn’t. And I haven’t tried these, but advise against them (except as discussed below), only for the sake of composition. I have tried taping one film lens of a (borrowed) pair of eclipse glasses over the camera lens, but the results have been mixed.
I would strongly discourage you from just taking a picture of the sun, even if partially or even completely blocked by the moon, with the black background, of course, and nothing else in the picture. That’s boring and indistinguishable from the millions of other sun shots that will flood Facebook by the end of the day. And there’s no proof that it was you that took the picture. OK, maybe take one for documentary purposes. Then you should have something in the foreground for interest. Hence the selphie. In place of you, or in addition, you could include friends or celebrities. Behind them you could have a lighthouse, nice tree, mountain, or even waterfall. Get creative. When scouting a location, keep in mind that the sun will be to the southwest. You can find more precise information in my recent blog, “Ready To Photograph The Next Solar Eclipse?“.
Selphie Sticks
Depending on your compositional goals, using a selphie stick could be helpful in this case. It makes the sun look bigger. Actually, the sun’s apparent size doesn’t change much when going from a distance of 93 million miles to 93 million miles plus 3 feet. But the image of your head could shrink to half of its original size when going from 3 to 6 feet.
I took the following pictures before the day of the eclipse to reconfirm the concepts. I have not edited the two photographs below, except for cutting the number of pixels on each side by 75% to speed loading and by adding the two same-sized circles (one red, one green) to each image to make it easier to compare the sun’s size to the head. Later, one might want to increase contrast, selectively increase exposure to certain areas, and maybe bring a little color back into the sky. I took the photo on the right without the benefits of the selfie stick. (It’s only still attached because I’m lazy efficient.)
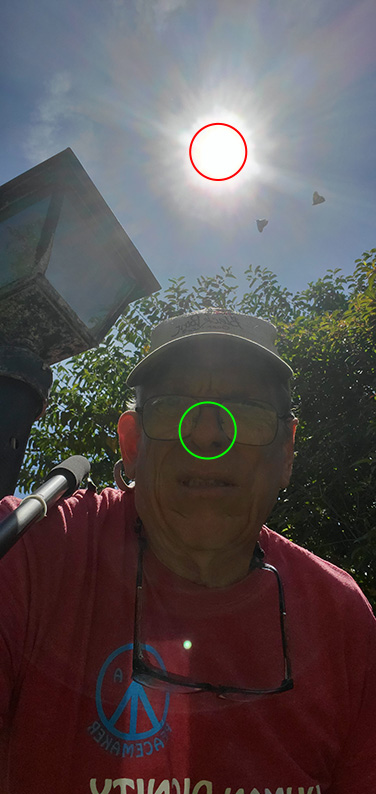
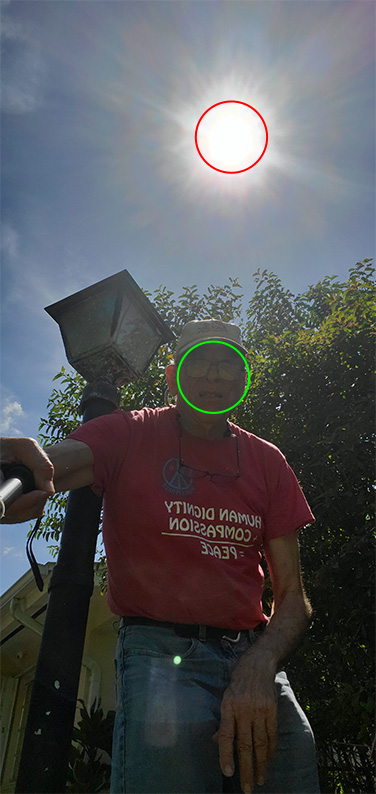
For what it’s worth, the two blobs below the sun in the right picture are butterflies. (Also, I see I forgot to turn off the mirror-image setting for the selfie camera. I don’t like that feature either.)
Fill Light
You will definitely need to add light to your foreground to compete with the sun for attention. Since the selfie camera doesn’t have flash, you could use a large flashlight. Portrait photographers commonly use reflectors for that purpose. Store-bought reflectors are compactible for storage and may have silver and gold surfaces in addition to white. For the picture on the right, I was holding a 16″ by 20″ piece of foam board in my left hand (remember, it’s a mirror image). One could instead use a light-colored umbrella, a towel, or even a piece of cardboard inside a kitchen garbage bag.
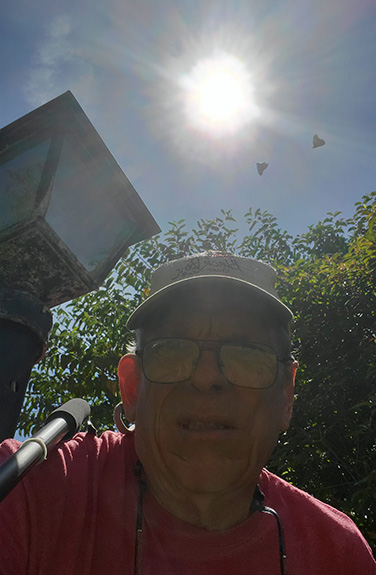
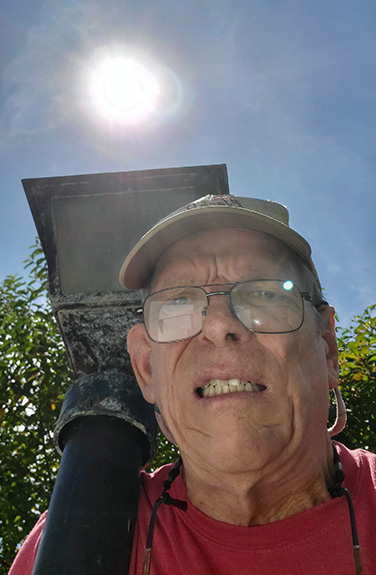
The image on the left is the same one as on the left in the first set, but without the colored circles obstructing the face (and sun). I cropped both images to just show their common areas (for better comparison). Again, no other editing was done.
Other Ideas
Just taking the shot could be problematic. My selfie stick’s Bluetooth trigger malfunctioned and the voice command option was unreliable. If those fail, the timer option is your best bet.
I have not yet seen a total eclipse, but for most of the eclipse, the sun and an area around it will be blown out. The more it’s obstructed, the less blowout I would expect. If you got one of those cell phone lens attachments, consider a composite image. Take your best shot as described above, then drop the reflectors and flashlights, put the lens attachment over the selfie lens and take a picture of the sun with all of the same camera settings. Your aim doesn’t have to be perfect as long as you have a well-focused sun somewhere on the screen. Everything else should be black anyway. Then combine them in post-processing. That may involve removing a fair amount of blown-out sky around the sun before adding the filtered sun and then maybe increasing the exposure on the new sun. I believe there are some new AI-assisted photo editing apps for the phone that should be able to handle that. I just use Photoshop. But the editing of this composite is beyond the scope of this article.
Having a buddy could be really helpful. You could take turns holding reflectors for each other. Or you could take each other’s picture so you wouldn’t need a selfie stick (and could also switch to a rear lens). Possibilities are endless. Remember, if using the camera in regular mode, you need to take utmost care to keep the camera directly between you and the sun and observe the sun only on your screen, not directly. That’s perhaps the best reason selfie mode is better.
Results [added 4/14/2024]
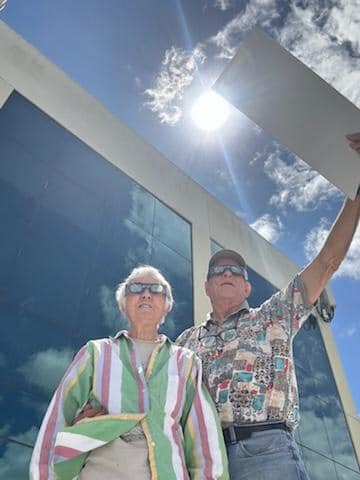
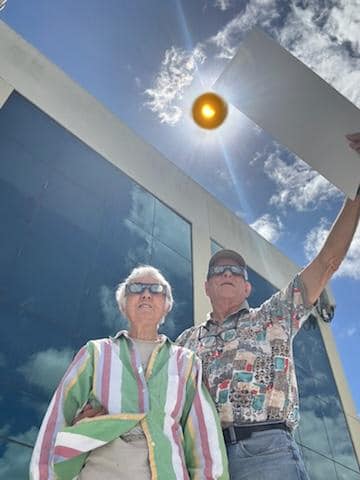
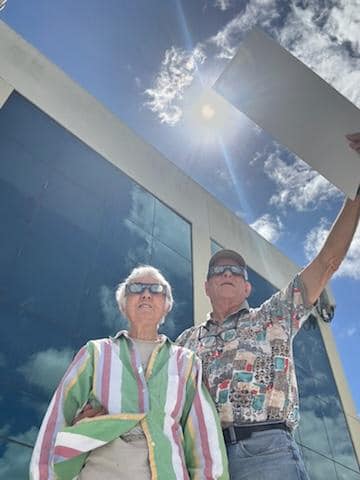
Below are three images of the same photo of Nancy and me taken during this eclipse by a friend of ours at different stages of processing. The first (leftmost) image is right out of the camera. As in the previous pictures, the sun is somewhere in the blown-out white circle. As I first discussed in the “First, The Bad News” section of Making “Eclipse Over Long Pine Key”, the blown out area is much larger than the sun. Based on flimsy Facebook evidence, the sun seems to remain blown out until the moon covers at least 95%. (If anybody has more reliable information about that, I’d appreciate your comments.)
In the rightmost image, the appropriate portion of a separate photo of the sun taken with all the same settings but with a solar filter (actually, the film from one eye of a pair of eclipse glasses) replaces the blown-out part. In the bottom image, I blended the two photos more realistically. That is the only editing that I did. Other improvements, like cropping better, editing out the reflector, selectively tweaking the exposure and contrast levels, returning more blue to the blown-out area, and/or replacing the clown on the right with a more attractive model, would be artistic decisions done solely at the discretion of the photographer, and are beyond the scope of this article.
Finally
That’s all I have. If you have additional suggestions, and especially if you’ve discovered other difficulties not addressed here, please share in the comment section below. Except for those in Montana, our next opportunity to see a total solar eclipse in the United States will be August 12, 2045. Good luck, and thank you.
Leave a Reply